About This Walkthrough
This walkthrough will take you through the following scenarios:
- Creating a customer
- Creating a site
- Creating an agreement
- Adding an item to the agreement
- Making the agreement live
Roles
- Sales Representative (John)
- Coordinator (Nicole)
Story
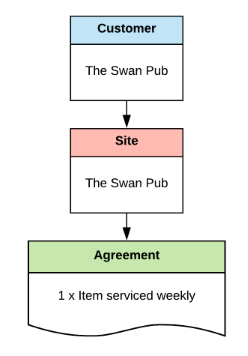
John is a sales representative. He has won a contract for The Swan Pub, who would like you to supply and service their main entrancing matting. Nicole is going to enter everything onto Service Manager. We will end up with the following structure when finished.
Creating the customer
- From the home page, choose Sales and the Customers button
- Choose the New Business tab
- Choose New on the toolbar to open the New Business Wizard
- Click Next to display the customer page
- Choose New, enter the reference as 'TSP001', company name as 'The Swan Pub' and the rest of the address
- As John was the Sales Representative for this customer you can pick him from the dropdown
And then pick Nicole as the Coordinator as she will be managing this account
Creating the site
- Choose Next, and say Yes to the site address being the same as the customer
- Enter any additional details you'd like to store
- Choose Next, to show the agreement details page
Creating the agreement
- Expand the invoice period dropdown and pick Monthly also enter a start date as the first of any month i.e. 14/10/2021
- Choose Finish, your new agreement will be displayed
Adding the entrance mat to the agreement
- Choose the Add Item sub menu and select Add Delivery Item
- Click the button (three dots) to the right of description to display the stock search window
- Enter 'BLUEMAT' in the code field and choose Search
- Select the '8ft x 4ft Blue Entrance Mat' entry in the grid and choose Ok, or you can double click the entry
- Pick the Frequency as Weekly
- Expand the Agreement Period dropdown and select 12 Monthly
- Leave the Quantity as '1' and the Cost as '£120'
- Choose Save, the item will be displayed in the items tab.
- The Period Total shows as £10, being £10 monthly and the Yearly Total as £120.
Amend the placement
- In the Placements grid, right click 'See Site Plan' choose Amend Placement
- Change the description to Main Entrance, click Save
- The Mats placement has changed to Main Entrance
Making the agreement live
In order to make an agreement live, ready to invoice and create it's manifest it first goes through an interim stage called pending. At this stage you can organize installations, mark it as waiting for stock to arrive and also setup deliveries.
- First print the agreement by expanding the options menu and choosing Print Agreement
- This will update the status of the agreement to 'Agreement Printed', and add a note to say the agreement has been print and you are awaiting a signed copy
- Again from the options menu choose Pass For Action
- This will prompt you to ask if the signed agreement has been received back from the customer. Choose Yes
- The screen will refresh and the Tab window changed to Pending, the agreement status now shows as 'Agreement Pending'. A couple of new notes have been added. One to say the customer has signed the agreement the other informing when the agreement was changed to pending and by whom.
- We will now make the agreement live, from the options menu choose Complete, the complete agreement page is shown
- The only thing to change in this walkthrough is the start date, make sure this is the same date from earlier (14/10/2021) and not today's date, choose Save
- The screen will refresh, the agreements tab selected and your agreement is displayed
- Note the Next Invoice Date and Service From Date's match, and the Service To date is one month later.
Next Steps
The agreement is now live and ready to be invoiced. Next you can follow the walkthrough for the setting up of deliveries or creating and emailing your first invoice.